CSS Float
The float property enables you to take an element out of normal flow and put content side-by-side. Elements are floated horizontally , that means, an element can only be floated left or right only.
.sidebox {
	float : right;
	width : 250px;
}
Float property accepts keyword values left and right float elements those directions respectively and set to none for not floated. When you set the float property for an element , you should specify the width and height otherwise its sizing becomes shrink-to-fit horizontally and vertically.
Consider the following example:
<!Doctype>
<html>
<head>
  <style>
    .box1 {
      background: #DDF;
      height: 100px;
      width:100px;
    }
    .box2 {
      background: #4FFFA1;
      height: 100px;
      width:100px;
    }
  </style>
</head>
<body>
  <div class="box1">
    Box1
  </div>
  <div class="box2">
    Box2
  </div>
</body>
</html>
When you run this code on browser you will get the folowing output:
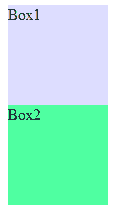
In the above picture the boxes are not set the float property.
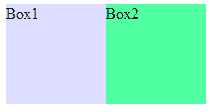
Now we set the float property to both boxes as float:left;
.box1 {
  float:left;
  background: #DDF;
  height: 100px;
  width:100px;
}
.box2 {
  float:left;
  background: #4FFFA1;
  height: 100px;
  width:100px;
}
In the above code we set float property to each box as float:left;
Now you can see the boxes floated from left to right.
Again we set first box as float:left and second box as float:right;
.box1 {
  float:left;
  background: #DDF;
  height: 100px;
  width:100px;
}
.box2 {
  float:right;
  background: #4FFFA1;
  height: 100px;
  width:100px;
}
output
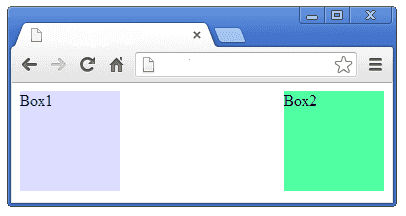
Now you can see first box is floted to left and second one is floated to right.
Clear
The clear property is used to control the flow of floating content. It actually cancel the effects of the float property. Clear property accepts keyword values left and right for clear elements those directions respectively and set the property both for clear both sides.
example
<!Doctype>
<html>
<head>
  <style>
    .box1 {
      float:right;
      background: #DDF;
      height: 100px;
      width:100px;
    }
    .box2 {
      float:right;
      background: #4FFFA1;
      height: 100px;
      width:100px;
    }
    .box3 {
      background: #FFAACC;
      height: 100px;
      width:100px;
    }
  </style>
</head>
<body>
  <div class="box1">
    Box1
  </div>
  <div class="box2">
    Box2
  </div>
  <div class="box3">
    Box3
  </div>
</body>
</html>
output

In the above code we set float property to right for both Box1 and Box2 . So the Box3 occupy the left end space and Box1 and Box2 floatedon right side.
Again we set the clear property to Box3 as clear:right;
.box1 {
  float:right;
  background: #DDF;
  height: 100px;
  width:100px;
}
.box2 {
  float:right;
  background: #4FFFA1;
  height: 100px;
  width:100px;
}
.box3 {
  clear:right;
  background: #FFAACC;
  height: 100px;
  width:100px;
}
output
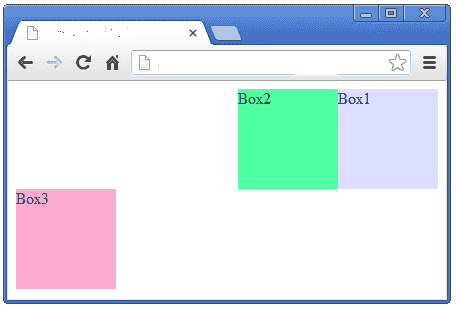
Now you can see the Box1 and Box2 floated on extreme right and Box3 is placed on the next level. Here Box3 clear the float property of the above two boxes, so it placed on the next line. If you set clear:both; will clear the left and right property of the float element.
z-index
While overlapping CSS elements, when using absolute and relative position, the default behavior is to have the first elements underneath later ones. In these cases we can control layering of positioned elements by using the z-index property . When using the z-index property you can specify which of the boxes appears on top the other one.
<!Doctype>
<html>
<head>
  <style>
    div {
      width:100px;
      height:100px;
    }
    div.box1 {
      background:#dad7d7;
      position:relative;
      z-index:1;
    }
    div.box2 {
      background:#ffe7bc;
      position:relative;
      top:-80px;
      left:50px;
      z-index:2;
    }
  </style>
</head>
<body>
  <div class="box1">    BOX - 1 </div>
  <div class="box2">    BOX - 2 </div>
</body>
</html>
output
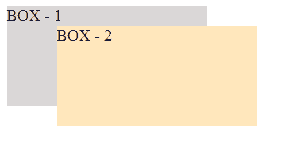
Now you can see the BOX-1 is behind the BOX-2, because z-index of BOX-1 is 1 and BOX-2 is 2. Now we are going to change the z-index order as BOX-1 is 2 and BOX-2 is 1.
div {
  width:100px;
  height:100px;
}
div.box1 {
  background:#dad7d7;
  position:relative;
  z-index:2;
}
div.box2 {
  background:#ffe7bc;
  position:relative;
  top:-80px;
  left:50px;
  z-index:1;
}
output
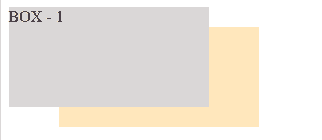
Now you can see BOX-1 come in front and BOX-2 going behind the BOX-1.
It is noted that z-index works on positioned elements only like position:absolute, position:relative and position:fixed.